
The battle plan
- Brampton Booster
- Dec 19, 2012
- Comment
It’s almost time for the winter break, so maybe I can get some stuff done.
Here is a question asked frequently: how should I attack? Should I go with my weakest unit first then onto the strongest? Or should I attack with my vanguard first? Is there anything wrong with attacking with this unit last? What is the best way to deplete the opponents hand?
These are all questions that really depend on the situation. You have heard tips on how to proceed, but sometimes you need to put down some numbers. You could do everything by hand, OR you can use my amazing program. Below is a spreadsheet program I wrote up to calculate the best action for a given scenario. This is only to be taken on a general point though, due to the complex nature of the battle phase.
Okay, it won’t magically tell you the answer to all your questions, but it is a very useful tool in determining how you should proceed. You just type in the power of the opposing vanguard and the combined power of your units and the spreadsheet does the rest. There are some limitations to the program however, but it should serve most of your needs.
- The program deals assumes that all attacks are aimed at the vanguard. Even if it doesn’t hit.
- The program only deals situations where the opponent either lets one or no attacks pass.
- It is assumed that when the opponent guards, they will use the minimum amount of guard to stop it.
- However, for vanguards they will guard for a two-pass.
- A trigger you receive would be put on a standing unit, otherwise it is mentioned
- The opponent has no Perfect Guards, resorting only to \10/ & \5/
- One trigger
- You are attacking for a maximum of three attacks per turn (I will go over stands)
- The program has a little bug when it comes to really weak attacks. I can’t really pin it down though.
- If you have any questions or find any bugs just give me a comment.
- You can put this in your site, since the spreadsheet contains my mark anyways.
- And the random disclaimers like “I’m not liable for damage done to your computer when using this program” and “I’m not affiliated with Bushiroad” and stuff like that.
There is a lot to presume, but if you would think about it these scenarios would make up the bulk of important scenarios. The chart gives no real answer to your questions you may have, and it involves furthur analysis to declare any verdict. I’ll start with a couple of scenarios and explain how you should plan your attack (Because that is what the post is about).
Let’s consider a very average field. To make it simple I’m just truncating the attacks to the 5000’s.
| 10k | ||
| 10k | 10k | 15k |
Using the program above you put our values in and
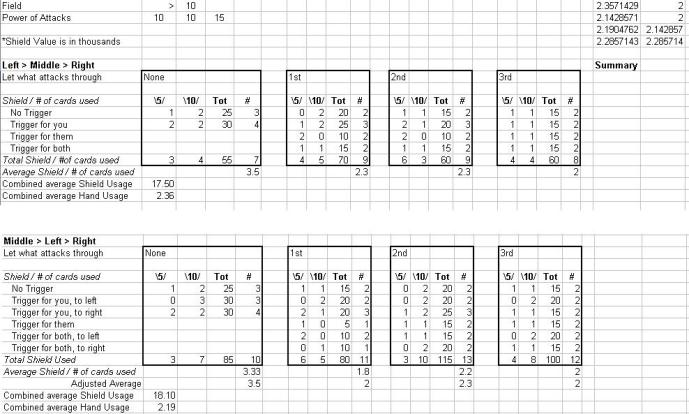
it seems that the best way to proceed is to go from Left > Middle > Right. This plan drains the most amount of cards on average, 2.36, with Middle > Right > Left coming in close second at 2.19. So attacking from Left to Right is the best way to proceed. (And by the best way, I mean that it drains the most amount of cards from the hand then any other set-up)
10
15 10 20
At fist glance, both Rearguards went up by 5k. Since the power difference is symmetrical, does that mean the plan is the same?
Left > Middle > Right takes 2.71 cards, while Middle > Left > Right removes 2.86.
But wait! Right > Middle > Left takes down 3.07 cards! This should be your plan of attack.
Let’s look at this a little closer now. Suppose you are facing the above scene, and you want to use the LEAST amount of guard. Looking at the chart, in the R>M>L section, letting the first attack through gives you the best chance, giving an average shield of 9/4, or 2.3. This is a sharp contrast to 3.07.
Now consider what happens when they choose to attack from left to right. As you learned it only brings down 2.71 cards on average. But if you let the first attack through, it goes up to 2.8!
So not only do you have to learn the best pattern of attack, you also need to learn the opponent’s guarding tactics. If they always like to let the first attack through, then ignore the average hand usage and consider only one column for the best scenario.
But this is only the start. Not only are there Stand Triggers, there is also consideration on Perfect guards, one-passes, skills, damage, and other factors. It is best to know the common patterns for your deck, and it will help with your attacks. Just remember this is just a tool to help you make that decision.
Before I end, I’ll give my own set of pointers to guide you in picking out the right battle plan.
REARGUARD -> VANGUARD -> REARGUARD
The ever balanced plan. You get both the ability of Stands and crits, plus you can use the rested units as fodder for some abilities. Attacking this way is better if your units are at 10k and 20k (versus the opponent’s 10k VG) and so is your Vanguard.
REARGUARD -> REARGUARD -> VANGUARD
This formation constantly scores low on the chart, but don’t let that fool you. Decks that run this formation, such as Nova Grapplers, make use of standing cards to force 1 extra card from the opponent’s reserve. The chance of this happening depends on your deck, but if you find the probability of getting the effect you can add that chance (as a decimal) to your average to produce the more accurate representation of this formation. With all that said, This format is rarely played and is usually the worse plan of attack.
This method starts to work when the probability is about 25% or higher, and works better if you have more powerful rearguards.
VANGUARD -> REARGUARD -> REARGUARD
The last combination, which has shown some popularity, is used by decks which contain no stand triggers. If your opponent starts with the vanguard while they has a full field, it is almost assumed that the deck has no stands, and rather contains CRITS, DRAWS and HEALS.
The Adjusted Average means that you put your trigger on the unit that would deplete the most cards from your opponents hands. Though the choice is not always clear, the average assumes you choose the right option. In actual play, expect these numbers to be slightly lower, but overall they represent a professional choice.
This deck performs better if the rearguards power is on the 15k/25k line (against a 10k VG) at the beginning of your attack. As you can probably tell, the switch between attack with either VG>RG>RG and RG>VG>RG is very dependant on the power levels of your units, and both constantly battle for the top spot. If your deck can swing into the early 20’s with ease, Attacking with your vanguard second proves to be the better choice, but if your deck can’t reach the 20’s a Vanguard frontal attack is appropriate.
Since some people NEVER ATTACK THE REARGUARD, I devised a deadly simple chart for that purpose.
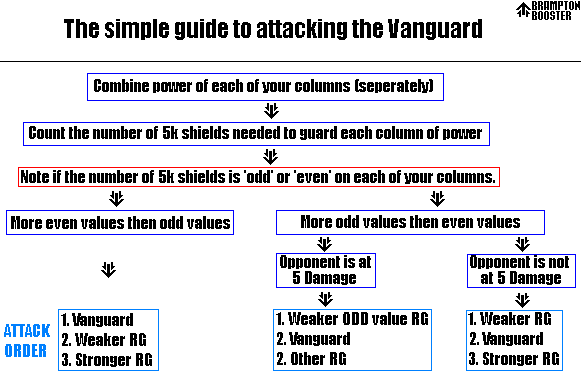
In a couple days, I will go over the basis on how I made this chart, why it works, and other power related stuff. Thanks for reading, and have a good day.