
Lesson 6: Setting up the field in stages
- Brampton Booster
- Jul 15, 2012
- Comment
Woah there! This is a REALLY outdated post. For more current and accurate articles visit my main page.
My personal favourite sport is chess. I, while not in the ranks of a grandmaster, have what it takes to play in tournament matches. So, this article will relate some concepts to chess. Even if you don’t know how to play, you’ll still understand what I’m saying as I’ll provide chess as examples, not answers.
It just so happens to be that vanguard is very similar to chess. Chess is not one game. It is comprised of three smaller games, subgames, and it is the result of each subgame that decides who will lead the next. The three subgames are the opening, middle game and endgame. Quite obvious what they refer to, but less obvious is understanding the transitions. Learning the transitions will help you prepare for vanguards subgames, which are equally similar. By the end of this article, you’ll not only find out how to distinguish and utilize them, but also find out what kind of type of subgame your deck is best suited for. I will also tell you how to calculate the Entropy of your deck at each stage.
Opening
The First vanguard already gives both of you most of the Winning Image of both fighters. Your plan in this section is to figure out completely what exactly is their Winning Image is. By the time the middle game rolls around, you won’t be quick enough to adapt to any changes by the opponent. at this stage you also have to be careful in how much damage you’ll take. Not only does it decide how fast you are going to be sent into the next subgame, it also reveals your deck and your Winning Image. Finally, it sets you up for trigger phasing.
Your first turn should be riding a vanilla unit, or a unit that goes up to 8000.
If you are attacking, then bring up another attacker. You will now see how important having a vanilla vanguard is on the defense. Since there are only 4 8000 power vanilla’s, if you don’t manage to get one you don’t get to hit the opponent. In fact, without triggers you might even be able to hit the vanguard! In the early game you should not put out so many units as you need to replace them next turn, and by not putting out so many units you can’t deal early pressure. And early pressure is important against the opponent. At this stage, they can only stop your attacks if they A) use an early trigger or B) use a grade 1 boosting unit. Either way, your getting an early advantage by applying pressure early game. Make sure you do not waste this opportunity. If they want that much damage, give it to them. They may be able to get better stuff, but it’s way to early and you can send them straight into the defense because they were pushed early. (Also note that you are taking advantage of attacking first to deal more damage, while losing the chance of early [HEAL])
And more proof why 8k vanillas are necessary in a deck. After you dealt damage to your opponent you can move this unit back for your grade 2’s. At this stage, you can bring out any grade 2 and have it boosted admirably into needing the opponent to guard with an early trigger (therefore reducing guard extremely early or putting out a large amount of damage before the grade 3 ride) 8000 vanilla’s after serving early damage or card advantage, moves into the role of anchorage for the rest of the game.

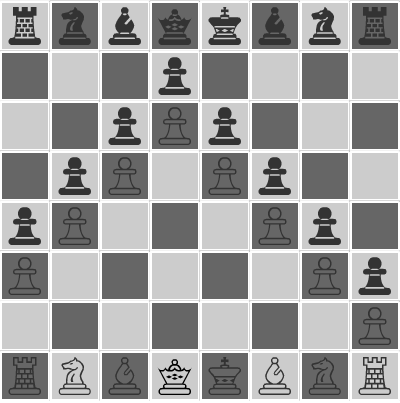
The Knights provide safe support to every other piece
What’s anchorage? In chess, it refers to having a minor piece being protected by a pawn. (that mass produced things that look like a ball perched on top of a pedestal). Pawns protect diagonally, so the two knights(the little horseys) are safe. The red squares refer to all the places your two knights can attack, while the blue squares are what the opponent can hit. The queen can take the knight but she is a very valuable piece unlike the knight, and can be taken by the pawn afterwards. So, regardless of what happens, the knight is in a very happy place. Just like vanguard, whatever is in front of an 8k vanilla booster is in a very happy place. Whatever the vanilla boost, your opponent will need 10000 to guard. The early 8000 Grade 2’s hits for 16000, requiring 10000 \S/ every time. However, you need to take into account its versatility is limited to only 4. Make sure you put something above it that is temporary. Grade 2’s are the best for this, but if you put grade 3’s confirm that your opponent might choose to attack it (like the +2k Grade’s that hit for 20k or some other pressuring card.)
The Entropy in the opening is -1 most of the time. This number is determined by how much you guard with before your middle game. Normally, you only guard one or two if they are rushing before the middle game (and sometimes none at all). However, if you stopped about 3 or more attacks, then your entropy took a hit as your options with the cards in your hand are gone. This -3 Entropy is suitable for an OTT deck, which has a very poor opening and therefore needs to use more resources to keep up with a normal deck. Royal Paladin is -1 since you allow more damage through and keeping a good field formation.
Grade 2 Ride – The first transition
The grade two turn has the same objective as the first turn; inflict as much damage as possible. If your opponent likes limit breaks, use that to your advantage and give them an early chance to use it.
All pawns are locked in place, providing little opportunity for anchorage
Make sure as your setting the field you don’t lock yourself out. But what does that mean? It is a position reached in which to get to your Winning Image, or perfect formation, you must replace units. As I said before, the pawns can only attack diagonally, not in front. So this fun little diddy here shows a position that all pawns are stuck. To move these pawns you must sacrifice something. Same in Vanguard, a good example is having a Silent Tom(8k) in front of a Cocoa(6k). 14k isn’t hitting for magic numbers, so therefore you need to either replace Silent Tom for a 10k attacker or replace Cocoa for a 8k booster.
The most common mistake of locking yourself is placing units too fast without thought. To ensure you don’t lock yourself out you first need to make a plan, your Winning Image. But you can’t just sit around with your vanguard only waiting for all the pieces to show up. So to make use of the time, you put out that vanilla booster for an early attack, and then moved it back for a Grade 2.
The intercept ability of grade 2’s are amazing. This ability really makes the field extremely flexible. By intercepting you left an open space while blocking an attack. This open space can now be refilled without replacing a unit; had it been a unit without intercept you had to have called over it. Intercept makes Grade 2’s spammable able to run out, smack the opponent in the face, block your opponent’s swipes and then ring out your real attackers(or more GR2’s).
Grade 1’s are always considered a lock-down. You should not expect the opponent to be Kagero and retire your back row (but along those lines, you need to expect the unexpected). If you pile two grade 1’s on the front row, congratulations, you have locked yourself out. A smart opponent won’t even attack that unit even if they could; rather the human instinct to conserve units will make noobs keep that line-up on the field and hit for BELOW magic numbers. And when they decide to replace it for another unit, then they just lost a card. No need to waste an attack there.
Actually, most of field formation should come naturally if you think about magic numbers and prepare for your Winning Image. Magic numbers will not let you noob up in placing stupid line-ups, and the Wining Image will guide you on what you want to build up. And just like Magic numbers, setting up the field will become a subconscious decision.
Before you move onto your middle game though, you need to consider one thing. Your opponent’s Winning Image. Right before your grade three ride, you draw three times and damage check twice. You also rode and called and drive checked once and maybe even guarded an attack. By keeping track of all of this the opponent has figured out should know out of the 14 cards you gotten almost 12 of those cards. Yep. At this stage, you should know what the opponent’s Winning Image is. Royal Paladin’s have big flashing lights for this sort of thing, so paying slight attention will tell you what you need to prepare for. At the early game, you can decide how to play from here. Do you reserve your forces? Or outrush them?
Middle Game
This is the real fight. Simply, the time when you go from the opening to the middle game is when you ride a grade 3. Actually, even if you don’t ride a grade 3 you still are into the mid game, feeling like a pokemon trainer who has taken the wrong path and went into a bush with Lv50’s. By now, having committed to Early pressure you have a good formation. Your entropy rose a bit but now you are gaining card advantage due to twin drive and various other stuff. Had you not the foresight of checking your opponent’s playstyle, your heading into the Ciudad Juarez blindfolded.
And it is hectic as hell. You get a bunch of triggers, a bunch of cards, a bunch of damage and whatever else you can pronounce a bunch. And like wise, you start using more powerful abilities, getting more triggers and getting more power and everything. Everything is explosive. Grade 3’s exponentialize this effect, due to creating +3 every turn and sharply increasing the chance of triggers.
On the flip side, you unfortunately succumb to a greater amount of entropy. This entropy rises due to the need for more shield, therefore less field options. I’m pretty sure that sometimes when playing a game you seem to have so few units on the field, and everything is kind of spread out. Or if you have a good field, your hand only contains triggers. At this stage your entropy count goes to -2. That’s because you need to guard more, keep a couple of abilities for the endgame, and your field is pretty full. But if you can gain more shield, with [DRAW] or other drawing cards, then your entropy dips a bit. Royal Paladin is the normal case of -2, but OTT become -2 because they get these drawing abilities. They still need to guard, but now they don’t waste the cards they really want. Finally, Granblue is kept at a -1 here, because they can REUSE effects, therefore getting MORE options. Additional factors to consider Entropy are the amount of cards you draw, the times when you can use skills and the current field.
How do you change cards you don’t want into something you do? The answer is Aermo. There’s a copy for every clan for its trading ability. Because even in a perfect deck, you still won’t get perfect draws and get some cards you can’t use. A RP deck doesn’t need 2 Soul Savior dragon for riding twice, they have it so you get SSD and not lose it to the damage zone. Same with the full moon goddess for OTT. Extra cards are placed to increase chance, so Aermo sifts out the cards you already have into something more suitable. Getting rid of the bad draws and replacing it with better ones. Aermo sometimes picks up triggers, but while you may fret you now have additional shield, additional options that you didn’t have before.
Critical Triggers. One set is too many. You want damage but are afraid they can check into a game breaking critical. Two or three sets? At least you can factor in more damage and plan accordingly. It is in this exact moment where you are going to pump out the perfect guards you’ve been saving. Stand trigger’s don’t have that fear and while it takes the same amount of guard your opponent can now pick and choose.
Grade 3’s start populating right around now, and you need to carefully place these units. If they have no effect in Rearguard, your opponent can choose to not attack it, and so you are left with a semi-beatstick. Such cards include the Grade 3 of ride chains like Tsukuyomi and Galahad, or main cards like Ezel and Vermillion. Either way, you can see that unit GR3’s with effects in Rearguard are much better here, as well as GR2’s with or without an effect. One thing that 11k Grade 3’s are good for is that they can hit anything without being boosted and without conditions. Had you chosen a Vanilla GR2 or another GR3, you might not be hit an 11k Vanguard (which are bull).
Winning Image – The second transition
Okay so there is no real spot here to know when the endgame comes up. In chess, you can see it when the board is nearly clear and there are only 2 or fewer pieces up. But in vanguard, a good player can conceal their perfect formation until the last moment. So you can’t find out when your opponent is ready for the endgame, but you can find your own.
Once you have everything set up, you are now ready for the endgame. This means you have your field completed, and have nothing else that you need. Also, your opponent has a low amount of Shield, so you can push through. Most of the time, you win once you get one trigger at the correct moment. That’s why it is absolutely to phase correctly for this moment. Taking damage can possibility knock you off your phasing, so be careful.
Obviously, this is where your Winning Image, your Final Turn is put to action. In a RP deck, A SSD or MLB will show you how it’s done, boosting units to high levels of power which should hopefully force a finishing blow. For OTT, you are ready once you confirm you have reached your stack and predict what you are going to drive check. But not only that, you have a Silent Tom at hand to work around your opponent. Granblue has a weak push, but once you are ready to bring everything back from the drop zone you can succeed.
Endgame
Let’s talk about Entropy first. By now, you have either used all of your resources, or are ready to use all of them (like using a Megablast, or bringing out your final units). Your hand is nearly gone, so everything you get will be put towards guarding. Finally, any card that you have used are likely to be sitting in the drop zone. Here, everything is locked and the only thing you can do is get a Trigger. Your hand, field, resources and drop zone has only one thing to do. And I’m being nice here in speaking that your entropy is -3. All of your advantage from twin drive and other abilities have pushed out the first two stages of entropy just barely. -3 is certainly a sealing number because at this point you can’t get any more advantage. Your draw and twin drive gives you three, which is directly opposing the -3 entropy.
Of course, that is for most decks. OTT and Granblue are nice little exceptions. Why? Well to understand that you need to know their mechanics. OTT is a end game deck: their Megablast allows them to draw 5 cards, and they can predict triggers (by stacking one or the entire deck). Once the stack is reached OTTs can see double triggers in the next drive check, which completely reverses entropy. At the endgame, you can now bring out units without needing them to guard, as you have knowledge of triggers backing you up. So normal decks go -1,-2,-3 OTT go -3,-2,-1.
Granblues is also an endgame deck, but with a different reason. Granblue’s mechanic utilizes the drop zone. By the end of the game, most units are in the drop zone, so when normal decks get more entropy as they have fewer cards, Granblues gain MORE options. That’s pretty scary, and is one of the few decks with a very low entropy throughout the game. (Sitting at -1,-1,-2)
Limit Breaks are Endgame abilities, so be careful when you want it. If you get it in your opponent’s middle game, you are taking the risk. The risk is obviously, losing early. But you have a reward in getting a heal and being reset to the middle game while putting the opponent up on the wall.
The two sides
As in any turn based game, each player has an advantage that benefits them. In chess, the two sides are White and Black. White players are more aggressive, and have the initiative (giving pressure and having the opponent respond to that instead of their own plan). Black is a defensive(due to White’s initiative) player which seeks to learn the opponent’s moves. In Vanguard White is the actually the second player, as they are the ones that reveal more information and start start aggressively. It is then the defender(Black, first player) that chooses the path to take. So note that people going first controls where the fight will go, While people going second will try to snatch that advantage from them.
The thing is all turn-based games has one player with the ‘better’ advantage. The ‘better’ advantage however is hidden amidst the player’s skill (and the card order in card games). So if you take advantage of all opportunities given to you, then you can win. And remember that you need to play at each sub-game, and it is within each subgame that advantages are most obviously giving. Taking the initiative in the opening is less important then in the endgame, because putting pressure on the opponent on the endgame will make it much easier to win.
« Lesson 5: Resources and Advantage » « Lesson 7: Attacking Rearguards »