
Standard, Standard Form Game
- Brampton Booster
- Aug 06, 2013
- Comment
(Crtl+F tl;dr to skip everything)
- Pre-reading: Alice’s Article on Game Theory
Introduction
Basically a huge Standard Form game to show the best way to attack/guard a normal 2/2/2. This is based upon the mid-game battle phase, and includes three different attack formations and the various ways to defend each attack. For all scenarios, the opponent will let only one attack through and guard the rest. The Trigger Ratio I will use is 12C/4H, both for simplicity and being the ideal ratio. I will mainly focus on damage; card advantage through other means is left to further study.
This is different from my Battle Plan article, which focused more on advantage gained based on differing amounts of power; this is focused on damage and card advantage in a normal field. If you are looking for endgame guarding values, look no furthur then TehNacho’s B.A.S.S. values.
By the way, most of the following is layers upon layers of data. You may skip to the analysis to avoid unnecessary hardships.
The Data
Let’s start with the easiest formation and letting the first attack through:
R > R > V
R>R>V: First Attack Through
| Drive Event | Damage Event | Chance | Damage Taken | Shield Loss | Card Loss |
|---|---|---|---|---|---|
| N/A | 1 Heal | 4/49 | 0 | 15 | 2 |
| N/A | 1 Trig | 12/49 | 1 | 15 | 2 |
| N/A | 0 Trig | 33/49 | 1 | 25 | 3 |
| Average ratio: | 45/49 | 21 36/49 | 2 33/49 |
Heals the drivees received is negligible as we are only focused on the damagee’ resources. It is important to include the heals for the opposing damage check, as it will reduce the damage taken for the attack.
The keyword ‘Trig’ refers to whatever trigger that was not present in the column. In the preceding example, Heal was specified and Trig was not. This means Trig refers to [STAND],[CRIT] and [DRAW]. None of these will affect the number of damage taken or the number of cards lost (Raw card loss to be precise; I’m to lazy to add another row for average card and the focus is on damage)
R>R>V: Second Attack Through
| Drive Event | Damage Event | Chance | Damage Taken | Shield Loss | Card Loss |
|---|---|---|---|---|---|
| N/A | 1 Heal | 4/49 | 0 | 20 | 2 |
| N/A | 1 Trig | 12/49 | 1 | 20 | 2 |
| N/A | 0 Trig | 33/49 | 1 | 25 | 3 |
| Average ratio: | 45/49 | 23 18/49 | 2 33/49 |
R>R>V: Third Attack Through
| Drive Event | Damage Event | Chance | Damage Taken | Shield Loss | Card Loss |
|---|---|---|---|---|---|
| 2 Crit | 3 Heal | 11/196*1/4606 | 0 | 20 | 2 |
| 2 Crit | 2 Heal | 11/196*135/9212 | 1 | 20 | 2 |
| 2 Crit | 1 Heal | 11/196*495/2303 | 2 | 20 | 2 |
| 2 Crit | 0 Heal | 11/196*7095/9212 | 3 | 20 | 2 |
| 1 Crit | 2 Heal | 37/98*1/196 | 0 | 20 | 2 |
| 1 Crit | 1 Heal | 37/98*15/98 | 1 | 20 | 2 |
| 1 Crit | 0 Heal | 37/98*165/196 | 2 | 20 | 2 |
| 0 Crit | 1 Heal | 111/196*4/49 | 0 | 20 | 2 |
| 0 Crit | 0 Heal | 111/196*45/49 | 1 | 20 | 2 |
| Average ratio: | 1 81/220 | 20 | 2 |
R > V > R
R>V>R: First Attack Through
| Drive Event | Damage Event | Chance | Damage Taken | Shield Loss | Card Loss |
|---|---|---|---|---|---|
| 2 Trig | 1 Heal | 5/49*4/49 | 0 | 25 | 3 |
| 2 Trig | 1 Trig | 5/49*12/49 | 1 | 25 | 3 |
| 2 Trig | 0 Trig | 5/49*33/49 | 1 | 35 | 4 |
| 1 Trig | 1 Heal | 22/49*4/49 | 0 | 20 | 2 |
| 1 Trig | 1 Trig | 22/49*12/49 | 1 | 20 | 2 |
| 1 Trig | 0 Trig | 22/49*33/49 | 1 | 30 | 4 |
| 0 Trig | 1 Heal | 22/49*4/49 | 0 | 15 | 2 |
| 0 Trig | 1 Trig | 22/49*12/49 | 1 | 15 | 2 |
| 0 Trig | 0 Trig | 22/49*33/49 | 1 | 25 | 3 |
| Average ratio: | 45/49 | 25 | 3 25/321 |
R>V>R: Second Attack Through
| Drive Event | Damage Event | Chance | Damage Taken | Shield Loss | Card Loss |
|---|---|---|---|---|---|
| 2 Crit | 3 Heal | 11/196*1/4606 | 0 | 15 | 2 |
| 2 Crit | 3 Trig | 11/196*55/4606 | 3 | 15 | 2 |
| 2 Crit | 2H/1T | 11/196*9/2303 | 1 | 15 | 2 |
| 2 Crit | 2T/1H | 11/196*33/2303 | 2 | 15 | 2 |
| 2 Crit | 2Heal | 11/196*99/9212 | 1 | 20 | 2 |
| 2 Crit | 2Trig | 11/196*1089/9212 | 3 | 20 | 2 |
| 2 Crit | 1H/1T | 11/196*198/2303 | 2 | 20 | 2 |
| 2 Crit | 1 Heal | 11/196*264/2303 | 2 | 25 | 3 |
| 2 Crit | 1 Trig | 11/196*792/2303 | 3 | 25 | 3 |
| 2 Crit | 0 Trig | 11/196*682/2303 | 3 | 30 | 3 |
| 2 Trig | 1 Heal | 1/196*4/49 | 0 | 25 | 3 |
| 2 Trig | 1 Trig | 1/196*12/49 | 1 | 25 | 3 |
| 2 Trig | 0 Trig | 1/196*33/49 | 1 | 30 | 3 |
| 1T/1C | 2 Heal | 2/49*1/196 | 0 | 20 | 2 |
| 1T/1C | 2 Trig | 2/49*11/196 | 2 | 20 | 2 |
| 1T/1C | 1T/1H | 2/49*2/49 | 1 | 20 | 2 |
| 1T/1C | 1 Heal | 2/49*11/98 | 1 | 25 | 3 |
| 1T/1C | 1 Trig | 2/49*33/98 | 2 | 25 | 3 |
| 1T/1C | 0 Trig | 2/49*22/49 | 2 | 30 | 3 |
| 1 Crit | 2 Heal | 33/98*1/196 | 0 | 15 | 2 |
| 1 Crit | 2 Trig | 33/98*11/196 | 2 | 15 | 2 |
| 1 Crit | 1T/1H | 33/98*2/49 | 1 | 15 | 2 |
| 1 Crit | 1 Heal | 33/98*11/98 | 1 | 20 | 2 |
| 1 Crit | 1 Trig | 33/98*33/98 | 2 | 20 | 2 |
| 1 Crit | 0 Trig | 33/98*22/49 | 2 | 25 | 3 |
| 1 Trig | 1 Heal | 11/98*4/49 | 0 | 20 | 2 |
| 1 Trig | 1 Trig | 11/98*12/49 | 1 | 20 | 2 |
| 1 Trig | 0 Trig | 11/98*33/49 | 1 | 25 | 3 |
| 0 Crit | 1 Heal | 22/49*4/49 | 0 | 15 | 2 |
| 0 Crit | 1 Trig | 22/49*12/49 | 1 | 15 | 2 |
| 0 Crit | 0 Trig | 22/49*33/49 | 1 | 20 | 2 |
| Average ratio: | 1 81/220 | 20 399/479 | 2 217/698 |
HOLY SMOKES! 31 possibilities! Don’t let it intimidate you though, most of it is boilerplate from now on.
R>V>R: Third Attack Through
| Drive Event | Damage Event | Chance | Damage Taken | Shield Loss | Card Loss |
|---|---|---|---|---|---|
| 2 Crit | 3 Heal | 11/196*1/4606 | 0 | 25 | 3 |
| 2 Crit | 3 Trig | 11/196*55/4606 | 3 | 25 | 3 |
| 2 Crit | 2H/1T | 11/196*9/2303 | 1 | 25 | 3 |
| 2 Crit | 2T/1H | 11/196*33/2303 | 2 | 25 | 3 |
| 2 Crit | 2Heal | 11/196*99/9212 | 1 | 25 | 3 |
| 2 Crit | 2Trig | 11/196*1089/9212 | 3 | 25 | 3 |
| 2 Crit | 1H/1T | 11/196*198/2303 | 2 | 25 | 3 |
| 2 Crit | 1 Heal | 11/196*264/2303 | 2 | 25 | 3 |
| 2 Crit | 1 Trig | 11/196*792/2303 | 3 | 25 | 3 |
| 2 Crit | 0 Trig | 11/196*682/2303 | 3 | 25 | 3 |
| 2 Trig | 1 Heal | 1/196*4/49 | 0 | 25 | 3 |
| 2 Trig | 1 Trig | 1/196*12/49 | 1 | 25 | 3 |
| 2 Trig | 0 Trig | 1/196*33/49 | 1 | 25 | 3 |
| 1T/1C | 2 Heal | 2/49*1/196 | 0 | 25 | 3 |
| 1T/1C | 2 Trig | 2/49*11/196 | 2 | 25 | 3 |
| 1T/1C | 1T/1H | 2/49*2/49 | 1 | 25 | 3 |
| 1T/1C | 1 Heal | 2/49*11/98 | 1 | 25 | 3 |
| 1T/1C | 1 Trig | 2/49*33/98 | 2 | 25 | 3 |
| 1T/1C | 0 Trig | 2/49*22/49 | 2 | 25 | 3 |
| 1 Crit | 2 Heal | 33/98*1/196 | 0 | 25 | 3 |
| 1 Crit | 2 Trig | 33/98*11/196 | 2 | 25 | 3 |
| 1 Crit | 1T/1H | 33/98*2/49 | 1 | 25 | 3 |
| 1 Crit | 1 Heal | 33/98*11/98 | 1 | 25 | 3 |
| 1 Crit | 1 Trig | 33/98*33/98 | 2 | 25 | 3 |
| 1 Crit | 0 Trig | 33/98*22/49 | 2 | 25 | 3 |
| 1 Trig | 1 Heal | 11/98*4/49 | 0 | 25 | 3 |
| 1 Trig | 1 Trig | 11/98*12/49 | 1 | 25 | 3 |
| 1 Trig | 0 Trig | 11/98*33/49 | 1 | 25 | 3 |
| 0 Crit | 1 Heal | 22/49*4/49 | 0 | 25 | 3 |
| 0 Crit | 1 Trig | 22/49*12/49 | 1 | 25 | 3 |
| 0 Crit | 0 Trig | 22/49*33/49 | 1 | 25 | 3 |
| Average ratio: | 1 81/220 | 25 | 3 |
Oh my god! So many possibilities…but wait. They look remarkably similar to the [R>V>R: Second Attack Through]. In fact, it is. In addition the fields [Chance] and [Damage Taken] is the EXACT SAME. That makes is a hell lot easier, and since the first two attacks are static, you know that \25/ is used every turn, 1 for the rearguard and 2 for the vanguard. Comparing it to letting the vanguard through…you waste almost 5000 more shield every turn for no reason at all.
V > R > R
There are two ways to allocate the triggers when you check double triggers with the vanguard first. It can either be all to one specific rearguard, or one on each side.
V > R > R – S
V>R>R-S: First Attack Through
| Drive Event | Damage Event | Chance | Damage Taken | Shield Loss | Card Loss |
|---|---|---|---|---|---|
| 2 Crit | 3 Heal | 11/196*1/4606 | 0 | 0 | 0+2 |
| 2 Crit | 3 Trig | 11/196*55/4606 | 3 | 0 | 0+2 |
| 2 Crit | 2H/1T | 11/196*9/2303 | 1 | 0 | 0+2 |
| 2 Crit | 2T/1H | 11/196*33/2303 | 2 | 0 | 0+2 |
| 2 Crit | 2Heal | 11/196*99/9212 | 1 | 10 | 2 |
| 2 Crit | 2Trig | 11/196*1089/9212 | 3 | 10 | 2 |
| 2 Crit | 1H/1T | 11/196*198/2303 | 2 | 10 | 2 |
| 2 Crit | 1 Heal | 11/196*264/2303 | 2 | 20 | 2 |
| 2 Crit | 1 Trig | 11/196*792/2303 | 3 | 20 | 2 |
| 2 Crit | 0 Trig | 11/196*682/2303 | 3 | 30 | 4 |
| 2 Trig | 1 Heal | 1/196*4/49 | 0 | 20 | 2 |
| 2 Trig | 1 Trig | 1/196*12/49 | 1 | 20 | 2 |
| 2 Trig | 0 Trig | 1/196*33/49 | 1 | 30 | 4 |
| 1T/1C | 2 Heal | 2/49*1/196 | 0 | 10 | 2 |
| 1T/1C | 2 Trig | 2/49*11/196 | 2 | 10 | 2 |
| 1T/1C | 1T/1H | 2/49*2/49 | 1 | 10 | 2 |
| 1T/1C | 1 Heal | 2/49*11/98 | 1 | 20 | 2 |
| 1T/1C | 1 Trig | 2/49*33/98 | 2 | 20 | 2 |
| 1T/1C | 0 Trig | 2/49*22/49 | 2 | 30 | 4 |
| 1 Crit | 2 Heal | 33/98*1/196 | 0 | 5 | 1+1 |
| 1 Crit | 2 Trig | 33/98*11/196 | 2 | 5 | 1+1 |
| 1 Crit | 1T/1H | 33/98*2/49 | 1 | 5 | 1+1 |
| 1 Crit | 1 Heal | 33/98*11/98 | 1 | 15 | 2 |
| 1 Crit | 1 Trig | 33/98*33/98 | 2 | 15 | 2 |
| 1 Crit | 0 Trig | 33/98*22/49 | 2 | 25 | 3 |
| 1 Trig | 1 Heal | 11/98*4/49 | 0 | 15 | 2 |
| 1 Trig | 1 Trig | 11/98*12/49 | 1 | 15 | 2 |
| 1 Trig | 0 Trig | 11/98*33/49 | 1 | 25 | 3 |
| 0 Crit | 1 Heal | 22/49*4/49 | 0 | 10 | 2 |
| 0 Crit | 1 Trig | 22/49*12/49 | 1 | 10 | 2 |
| 0 Crit | 0 Trig | 22/49*33/49 | 1 | 20 | 2 |
| Average ratio: | 1 81/220 | 18 361/901 | 2 197/649 |
V>R>R-S: Fewer Critical/Last Rearguard Attack Through
| Drive Event | Damage Event | Chance | Damage Taken | Shield Loss | Card Loss |
|---|---|---|---|---|---|
| 2 Crit | 2Heal | 11/196*1/196 | 0 | 20 | 3 |
| 2 Crit | 2Trig | 11/196*11/196 | 2 | 20 | 3 |
| 2 Crit | 1H/1T | 11/196*2/49 | 1 | 20 | 3 |
| 2 Crit | 1 Heal | 11/196*11/98 | 1 | 25 | 3 |
| 2 Crit | 1 Trig | 11/196*33/98 | 2 | 25 | 3 |
| 2 Crit | 0 Trig | 11/196*22/49 | 2 | 30 | 4 |
| 2 Trig | 1 Heal | 1/196*4/49 | 0 | 25 | 3 |
| 2 Trig | 1 Trig | 1/196*12/49 | 1 | 25 | 3 |
| 2 Trig | 0 Trig | 1/196*33/49 | 1 | 30 | 4 |
| 1T/1C | 1 Heal | 2/49*4/49 | 0 | 30 | 4 |
| 1T/1C | 1 Trig | 2/49*12/49 | 1 | 30 | 4 |
| 1T/1C | 0 Trig | 2/49*33/49 | 1 | 30 | 4 |
| 1 Crit | 1 Heal | 33/98*4/49 | 0 | 30 | 4 |
| 1 Crit | 1 Trig | 33/98*12/49 | 1 | 30 | 4 |
| 1 Crit | 0 Trig | 33/98*33/49 | 1 | 30 | 4 |
| 1 Trig | 1 Heal | 11/98*4/49 | 0 | 25 | 3 |
| 1 Trig | 1 Trig | 11/98*12/49 | 1 | 25 | 3 |
| 1 Trig | 0 Trig | 11/98*33/49 | 1 | 25 | 3 |
| 0 Crit | 1 Heal | 22/49*4/49 | 0 | 20 | 3 |
| 0 Crit | 1 Trig | 22/49*12/49 | 1 | 20 | 3 |
| 0 Crit | 0 Trig | 22/49*33/49 | 1 | 25 | 3 |
| Average ratio: | 419/432 | 26 7/26 | 3 197/485 |
For 2 Crit, the crits are distributed on both sides so each side has +1 Crit. That’s why you can’t have 3 Heal in the following “2 Crit” Drive Event
V > R > R – P
V>R>R-P: First Attack Through
| Drive Event | Damage Event | Chance | Damage Taken | Shield Loss | Card Loss |
|---|---|---|---|---|---|
| 2 Crit | 3 Heal | 11/196*1/4606 | 0 | 5 | 1+1 |
| 2 Crit | 3 Trig | 11/196*55/4606 | 3 | 5 | 1+1 |
| 2 Crit | 2H/1T | 11/196*9/2303 | 1 | 5 | 1+1 |
| 2 Crit | 2T/1H | 11/196*33/2303 | 2 | 5 | 1+1 |
| 2 Crit | 2Heal | 11/196*99/9212 | 1 | 10 | 1+1 |
| 2 Crit | 2Trig | 11/196*1089/9212 | 3 | 10 | 1+1 |
| 2 Crit | 1H/1T | 11/196*198/2303 | 2 | 10 | 1+1 |
| 2 Crit | 1 Heal | 11/196*264/2303 | 2 | 20 | 3 |
| 2 Crit | 1 Trig | 11/196*792/2303 | 3 | 20 | 3 |
| 2 Crit | 0 Trig | 11/196*682/2303 | 3 | 30 | 3 |
| 2 Trig | 1 Heal | 1/196*4/49 | 0 | 20 | 3 |
| 2 Trig | 1 Trig | 1/196*12/49 | 1 | 20 | 3 |
| 2 Trig | 0 Trig | 1/196*33/49 | 1 | 30 | 3 |
| 1T/1C | 2 Heal | 2/49*1/196 | 0 | 10 | 1+1 |
| 1T/1C | 2 Trig | 2/49*11/196 | 2 | 10 | 1+1 |
| 1T/1C | 1T/1H | 2/49*2/49 | 1 | 10 | 1+1 |
| 1T/1C | 1 Heal | 2/49*11/98 | 1 | 20 | 3 |
| 1T/1C | 1 Trig | 2/49*33/98 | 2 | 20 | 3 |
| 1T/1C | 0 Trig | 2/49*22/49 | 2 | 30 | 3 |
| 1 Crit | 2 Heal | 33/98*1/196 | 0 | 5 | 1+1 |
| 1 Crit | 2 Trig | 33/98*11/196 | 2 | 5 | 1+1 |
| 1 Crit | 1T/1H | 33/98*2/49 | 1 | 5 | 1+1 |
| 1 Crit | 1 Heal | 33/98*11/98 | 1 | 15 | 2 |
| 1 Crit | 1 Trig | 33/98*33/98 | 2 | 15 | 2 |
| 1 Crit | 0 Trig | 33/98*22/49 | 2 | 25 | 3 |
| 1 Trig | 1 Heal | 11/98*4/49 | 0 | 15 | 2 |
| 1 Trig | 1 Trig | 11/98*12/49 | 1 | 15 | 2 |
| 1 Trig | 0 Trig | 11/98*33/49 | 1 | 25 | 3 |
| 0 Crit | 1 Heal | 22/49*4/49 | 0 | 10 | 2 |
| 0 Crit | 1 Trig | 22/49*12/49 | 1 | 10 | 2 |
| 0 Crit | 0 Trig | 22/49*33/49 | 1 | 20 | 2 |
| Average ratio: | 1 81/220 | 18 178/435 | 2 217/698 |
V>R>R-P: Fewer Critical/Last Rearguard Attack Through
| Drive Event | Damage Event | Chance | Damage Taken | Shield Loss | Card Loss |
|---|---|---|---|---|---|
| 2 Crit | 1 Heal | 11/196*4/49 | 0 | 35 | 4 |
| 2 Crit | 1 Trig | 11/196*12/49 | 1 | 35 | 4 |
| 2 Crit | 0 Trig | 11/196*33/49 | 1 | 35 | 4 |
| 2 Trig | 1 Heal | 1/196*4/49 | 0 | 25 | 3 |
| 2 Trig | 1 Trig | 1/196*12/49 | 1 | 25 | 3 |
| 2 Trig | 0 Trig | 1/196*33/49 | 1 | 25 | 3 |
| 1T/1C | 1 Heal | 2/49*4/49 | 0 | 35 | 4 |
| 1T/1C | 1 Trig | 2/49*12/49 | 1 | 35 | 4 |
| 1T/1C | 0 Trig | 2/49*33/49 | 1 | 35 | 4 |
| 1 Crit | 1 Heal | 33/98*4/49 | 0 | 30 | 4 |
| 1 Crit | 1 Trig | 33/98*12/49 | 1 | 30 | 4 |
| 1 Crit | 0 Trig | 33/98*33/49 | 1 | 30 | 4 |
| 1 Trig | 1 Heal | 11/98*4/49 | 0 | 25 | 3 |
| 1 Trig | 1 Trig | 11/98*12/49 | 1 | 25 | 3 |
| 1 Trig | 0 Trig | 11/98*33/49 | 1 | 25 | 3 |
| 0 Crit | 1 Heal | 22/49*4/49 | 0 | 20 | 3 |
| 0 Crit | 1 Trig | 22/49*12/49 | 1 | 20 | 3 |
| 0 Crit | 0 Trig | 22/49*33/49 | 1 | 25 | 3 |
| Average ratio: | 45/49 | 26 23/25 | 3 85/196 |
And sometimes this happens; normally you can’t take the damage but you may not be able to guard that much (due to guarding misplays)
V>R>R-P: More Critical/First Rearguard Attack Through
| Drive Event | Damage Event | Chance | Damage Taken | Shield Loss | Card Loss |
|---|---|---|---|---|---|
| 2 Crit | 3 Heal | 11/196*1/4606 | 0 | 15 | 2+1 |
| 2 Crit | 3 Trig | 11/196*55/4606 | 3 | 15 | 2+1 |
| 2 Crit | 2H/1T | 11/196*9/2303 | 1 | 15 | 2+1 |
| 2 Crit | 2T/1H | 11/196*33/2303 | 2 | 15 | 2+1 |
| 2 Crit | 2Heal | 11/196*99/9212 | 1 | 15 | 2+1 |
| 2 Crit | 2Trig | 11/196*1089/9212 | 3 | 15 | 2+1 |
| 2 Crit | 1H/1T | 11/196*198/2303 | 2 | 15 | 2+1 |
| 2 Crit | 1 Heal | 11/196*264/2303 | 2 | 20 | 3 |
| 2 Crit | 1 Trig | 11/196*792/2303 | 3 | 20 | 3 |
| 2 Crit | 0 Trig | 11/196*682/2303 | 3 | 25 | 3 |
| 2 Trig | 1 Heal | 1/196*4/49 | 0 | 25 | 3 |
| 2 Trig | 1 Trig | 1/196*12/49 | 1 | 25 | 3 |
| 2 Trig | 0 Trig | 1/196*33/49 | 1 | 25 | 3 |
| 1T/1C | 2 Heal | 2/49*1/196 | 0 | 15 | 2+1 |
| 1T/1C | 2 Trig | 2/49*11/196 | 2 | 15 | 2+1 |
| 1T/1C | 1T/1H | 2/49*2/49 | 1 | 15 | 2+1 |
| 1T/1C | 1 Heal | 2/49*11/98 | 1 | 20 | 3 |
| 1T/1C | 1 Trig | 2/49*33/98 | 2 | 20 | 3 |
| 1T/1C | 0 Trig | 2/49*22/49 | 2 | 25 | 3 |
| 1 Crit | 2 Heal | 33/98*1/196 | 0 | 15 | 2+1 |
| 1 Crit | 2 Trig | 33/98*11/196 | 2 | 15 | 2+1 |
| 1 Crit | 1T/1H | 33/98*2/49 | 1 | 15 | 2+1 |
| 1 Crit | 1 Heal | 33/98*11/98 | 1 | 20 | 3 |
| 1 Crit | 1 Trig | 33/98*33/98 | 2 | 20 | 3 |
| 1 Crit | 0 Trig | 33/98*22/49 | 2 | 25 | 3 |
| 1 Trig | 1 Heal | 11/98*4/49 | 0 | 25 | 3 |
| 1 Trig | 1 Trig | 11/98*12/49 | 1 | 25 | 3 |
| 1 Trig | 0 Trig | 11/98*33/49 | 1 | 25 | 3 |
| 0 Crit | 1 Heal | 22/49*4/49 | 0 | 20 | 3 |
| 0 Crit | 1 Trig | 22/49*12/49 | 1 | 20 | 3 |
| 0 Crit | 0 Trig | 22/49*33/49 | 1 | 25 | 3 |
| Average Ratio: | 1 81/220 | 22 453/590 | 3 |
##Analysis
Here I’ve summarized the ‘average ratios’ of all the possibilities so you can quickly glance in a nice chart:
| Plan | Damage | Shield | Cards |
|---|---|---|---|
| R>R>V | |||
| First Attack Through | 45/49 | 21 36/49 | 2 33/49 |
| Second Attack Through | 45/49 | 23 18/49 | 2 33/49 |
| Third Attack Through | 1 81/220 | 20 | 2 |
| R>V>R | |||
| First Attack Through | 45/49 | 25 | 3 25/321 |
| Second Attack Through | 1 81/220 | 20 399/479 | 2 217/698 |
| Third Attack Through | 1 81/220 | 25 | 3 |
| V>R>R-Spread | |||
| First Attack Through | 1 81/220 | 18 361/901 | 2 197/649 |
| Fewer C/L RG atk Through | 419/432 | 26 7/26 | 3 197/485 |
| V>R>R-Piled | |||
| First Attack Through | 1 81/220 | 18 178/435 | 2 217/698 |
| Fewer C/L RG atkThrough | 45/49 | 26 23/25 | 3 85/196 |
| More C/F RG atkThrough | 1 81/220 | 22 453/590 | 3 |
The first thing to notice that there are only two distinct numbers for damage taken (treat 419/432 as 45/49: the difference is statistically insignificant and I may have entered an incorrect value somehow). So it is time to organize the plans by damage to determine the best strategy.
Average 1.4 Damage (1 81/220 D)
| Attack Plan | Guard Plan | Shield | Cards |
|---|---|---|---|
| R>R>V | Third Attack Through | 20 | 2 |
| R>V>R | Second Attack Through | 20 399/479 | 2 217/698 |
| R>V>R | Third Attack Through | 25 | 3 |
| V>R>R-S | First Attack Through | 18 361/901 | 2 197/649 |
| V>R>R-P | First Attack Through | 18 178/435 | 2 217/698 |
| V>R>R-P | More C/F RG atk Through | 22 453/590 | 3 |
Starting with R>V>R, by either letting the second or third attack through the same amount of damage is inflicted. But \25/ is certain for the latter, while the former needs almost one stage less. Therefore, letting the second, or vanguard attack through will be the better decision. Moving on to V>R>R, [P] certainly beat [S] in shield and cards for both guarding plans (turn fraction into decimal), although opponents should optimally let the first (read: vanguard) attack through.
Combining both, R>V>R forces the most cards from a players hand regardless of how the opponent chooses to guard.
Average 0.9 Damage (45/49 D)
| Attack Plan | Guard Plan | Shield | Cards |
|---|---|---|---|
| R>R>V | First Attack Through | 21 36/49 | 2 33/49 |
| R>R>V | Second Attack Through | 23 18/49 | 2 33/49 |
| R>V>R | First Attack Through | 25 | 3 25/321 |
| V>R>R-S | Fewer C/L RG atk Through | 26 7/26 | 3 197/485 |
| V>R>R-P | Fewer C/L RG atk Through | 26 23/25 | 3 85/196 |
In an R>R>V format, letting the first is better then the second, obvious since both deal the same damage but one comes after the other allowing counter-triggers to reduce shield. The number of cards is still the same so keep that in mind. In V>R>R, putting all the effects on one rearguard is still the better solution for the fighter and in fact is the best.
Finally, comparing the two damages. Turning fractions into decimals it appears as if the difference between 1.4 and 0.9 to be exactly 0.5. The actually difference is nothing significant, so we can assume the difference to be that. Looking at the optimal guarding solution for the opponent, we find the following chart. Note that comparing strategies to each other is nonsense. I can only figure out how much cards are saved by taking 0.5 more damage and multiplying the result by two will give the difference for 1 more damage.
Cards used to get average damage ‘D’ (In decimals)
| 0.9D | 1.4D | Difference per 1D | |
|---|---|---|---|
| R>R>V | 2.673 | 2.000 | 1.4 |
| R>V>R | 3.078 | 2.311 | 1.5 |
| V>R>R-S | 3.405 | 2.304 | 2.2 |
| V>R>R-P | 3.434 | 2.311 | 2.2 |
By taking one extra damage from a V>R>R attack, you will save 2 cards from your hand. That means it will be much better to take the 1.4D path over the 0.9D path. Alternatively for a R>R>V formation the difference is only 1.4D which makes guarding for 0.9D a wiser option. 1.5D is the benchmark when it comes to damage. It means there is an equal chance of using one card and using two cards. Obviously, if an attack could be blocked with just one card that will be great. But if it needed two cards, and the hit is affordable then the attack may be let through, so that 2 future attacks could be stopped with the cards saved. Interestingly R>V>R provides that dilemma as to what damage is wanted.
From the chart, it may seem that V>R>R-P is the best plan to use against a fighter regardless of how the opponent decides to guard. But remember that the cards used != shield used. These are two situations explain it:
- Opponent does not have a \5/ and instead uses a \10/, more Shield used though card loss is the same.
- Opponent does not have a \10/ and instead uses two \5/, more Cards used though shield loss is the same.
Due to the ratio between 1 and 2 stage shields, the latter is a much more common scenario. Shield is actually a slightly more accurate representation and the results of two specific plans are shown below.
Shield used to get average damage ‘D’ (In decimals)
| 0.9D | 1.4D | Difference per 1D | |
|---|---|---|---|
| R>V>R | 25.0 | 20.8 | 8 |
| V>R>R-P | 26.9 | 18.4 | 17 |
With V>R>R, there is no question taking 1.4D is a vastly superior option to limiting the damage to 0.9D (saving 7000 Shield per damage). But if you decide to take 1.4D, then an R>V>R formation is better as it forces about 2400 more SHIELD. But if the fighter wants to use a R>V>R formation then the opponent will might decide on a 0.9D solution. In that case, V>R>R-P beats it. It’s an endless loop!
Or is it? Will the opponent be able to use an extra card each turn to stave off 0.5 damage? Remember that even though the opponent has a solid hand size in hand some may be allocated for future use (to finish filling up the field, or perfects guards waiting for the right moment). It seems more likely the opponent will just accept the abuse for at least one turn in order to get more card options. So when the opponent values cards over damage in hand a R>V>R is the best solution. Once the field is set up just the way they want it, or when the damage approaches 4 the opponent will change guarding tactics (stop vg to prevent crits) in order to allow room to breathe. At that time a V>R>R-P is acceptable now that they can’t allow too much damage/take the 1.4D option.
I summarized the data into a nice flowchart so that regardless of how irrational the opponent may be you have the correct guarding procedure. The circles in the Lead Attack Formation column shows that both are about equal.
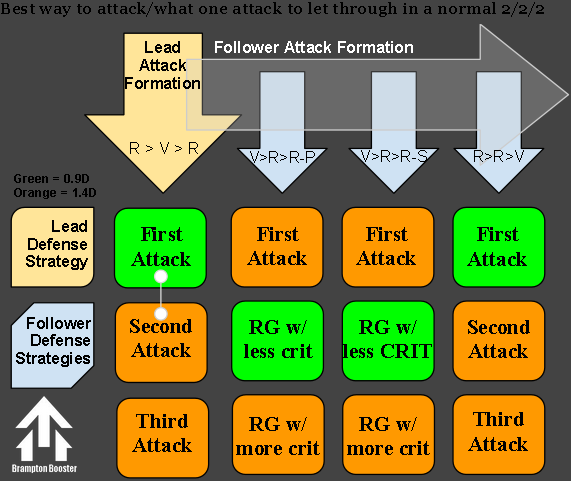
Adding On-hit pressure
Almost no game will be like this. (well Bushiroad is starting to make it like this with so many limit break restricted plays but…) What some decks have are units with on-hit effects, those that threaten to get advantage if allowed through. Most see them as inferior as the whether the advantage is gained is dependent on the opponent. That isn’t necessarily true. On-hit units forces the opponent to play a specific guarding strategy, and in what was just done, letting one attack go over another can change the amount of guard and still create advantage in the most subtle ways.
Let’s start with on-hit vanguards. Stern Blaukluger in particular can end games prematurely if it ever connects. As an owner of said deck, I’ve come back from near defeat just by one application of its effect (including one game where I was grade-locked for two turns) but there are other games that are not so outlier but created the same effect. Since these kinds of vanguards give a very large advantage, it is best to block the attack. Doing so will eliminate some strategies. Comparing it to the the previous chart will yield:
If the on-hit vanguard knocks out the lead defense strategy, then the opponent must resort to a normally dominated strategy. In this particular case, a fighter using V>R>R-P has an opponent making two choices:
- Take the 0.9D option. By choosing this the opponent uses more cards then ‘normal’ (1.5cards/damage). Difference of cards per damage is 2.2.
- Take the 1.4D option. Again, this means the opponent loses 1 more card then (3 cards versus 2 217/698 cards)
So whatever choice the opponent makes, the fighter benefits with a very dangerous vanguard. One thing not to do is the attack with the Rearguards first; though there was logic behind that already.
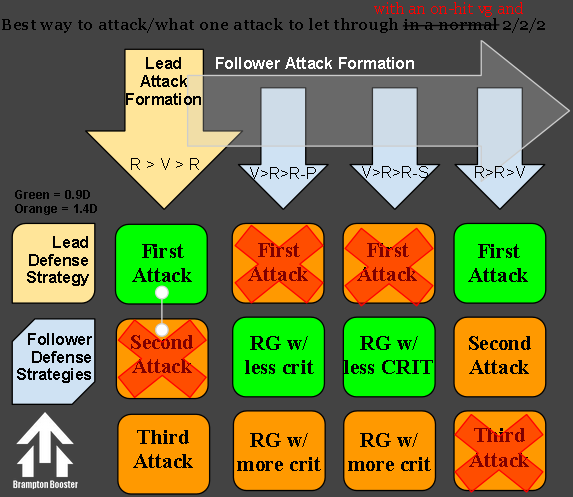
Maybe you don’t have a pressuring vanguard but rather a rearguard with something like (CB2: Draw a card). In that case:

On first glance it looks very nice with all the crosses but this as you will see is misleading. The lead defense strategy for the lead attack pattern is removed, but although the lead suggests that letting the first attack through is best, remember the “Difference per 1D” was 1.5D, making it an even split decision. For both V>R>R formations the best solution isn’t negated so the rearguard doesn’t create a threat. R>R>V is the only place where rearguard on-hits are viable…but R>R>V is the WORSE attack formation out there.
The only advantage of on-hit rearguards is that they can force a 1.4D tempo. Opponents that want a slower tempo (like near late game) must decide on letting it through to ‘equal’ the advantage or just hope the fighter doesn’t get a critical trigger and force a B.A.S.S reading. Forcing a 1.4D tempo is very nice for Spike Brothers and any other rush decks that try to finish the game as soon as possible. Otherwise, on-hit rearguards aren’t threatening enough to change the game by themselves. They need to be combined with a second on-hit rearguard, appear in the early/late game, bonded with an on-hit vanguard or just get a power up.
Conclusion
WOW. That was freaking heavy. If you aren’t asleep after all this I give you this piece of cake for effort. I lied.
tl;dr
On the attack
Opponent Damage < 4 : R>V>R
Opponent Damage => 4 : V>R>R
On the defense
If vanguard is Stern-like: GUARD THE VANGUARD
If vanguard is not Stern-like: Let first attack through